Pages

Showing posts with label Blue. Show all posts

Monday, 3 March 2014

Morgan Taylor 'Polished Up Punk' Swatches & Review + Nail Art


* Product provided for review


Hello! I know I sound like a record stuck on repeat, but apologies yet again for being so absent. I've been away from home so much over the past month it feels like I've hardly been here...but things have settled down now, so here I am!

I was delighted to be contacted by Morgan Taylor recently and asked to review a couple of polishes from their 'Glam Rock' collection (which I believe was for Winter 2014). The Glam Rock collection is described as 'A mixture of funky metallic shades and glitters to bring out the rebel in you!' and consists of six polishes:


Left to right, they are:
Better in Leather – Black silver glitter
Little Misfit – Lavender and aqua duo chrome
Polished Up Punk - Navy crème
Pretty Wild – Lavender greige crème 
Rebel With A Cause – Deep burgundy pearl
Studs and Stilettos – Gunmetal glitter

If you're not familiar with the Morgan Taylor brand, here's a little blurb from the company:

'Morgan Taylor has been created by Gelish founders Danny Haile and David Daniel. The specialist formula is made from raw ingredients enhances finish, coverage and wear ensuring that not only your nails will look gorgeous but they will stay that way too!RRP £10.99 each from Sallyexpress.com'

The polish I'm showing you today is the navy crème, 'Polished Up Punk'*.  I also received 'Little Misfit', the duochrome, so expect to see that one at some point in the near future!


'Polished Up Punk', two coats plus top coat

'Polished Up Punk' is a dark navy which appears blackened in some lights, but remains just on the right side of black - by which I mean that it is almost always discernibly blue and not black. I think its depth is more apparent in the nail art photos below. It's a very winter-appropriate colour and I always think these kinds of shades look especially foxy on short nails. I found the formula very nice: it was neither too runny nor too thick, spread smoothly and had great opacity - I used two coats plus top coat here, but you could conceivably get away with one if you were careful. I also really liked the shape of the brush, which is flat but not too wide (I know a lot of people can't stand super-wide brushes) and a sensible length. Please excuse the slight scuff marks in the above photos - my goopy top coat was responsible, not the polish itself! I didn't wear this manicure long enough to comment authoritatively on wear time, but I wouldn't expect any problems if worn with a good top coat.

Aaand I wouldn't feel like I was blogging properly if I didn't throw in some nail art, so...

Saturday, 25 January 2014

Burns' Night Nail Art/BPS Striping Tape Review

Hi friends! Just a quick post from me tonight - some Scottish-y themed nail art for Burns' Night and a wee review of this striping tape from Born Pretty Store. (Discount code at the bottom of the post, too!)


Saturday, 12 October 2013

Blue & Black Splodges/Cow Print | Nail Art

Holaaa! Another winner of a post title... We're off to Spain for a week tomorrow (well, tonight) so I really should be doing something sensible, like packing. But here I am! I painted these nails last night and I like them a lot - they were really quick today and I have such a thing for blue & black at the moment. I think they look a bit like very funky cow print nails, though I didn't strictly go in with that in mind, haha.


The blue is Kiko 336 - basically a dupe of Nails Inc Baker Street (which I don't own) and all those like it. LOVE this kind of electric blue and I really hope it never goes out of fashion!


Must dash! Have a splendid week!

Thursday, 19 September 2013

Blue 'Ikat Beach Tote' Nail Art

Hihi! This is really going to be a quick post because I'm really going to go to bed. Honest.


These nails were inspired by this beach tote bag which appeared as an a sidebar ad during a recent blog-reading spate - who'd have thought there was inspiration to be found in internet adverts?! If you have a better name for this design, let me know!

I began with a base of Sally Hansen Complete Salon Manicure 'Thinking of Blue' (two coats), which I love. It has a slight dustiness, but also a certain richness and perhaps the littlest hint of 'blurple'. I really like the CSM brush, too (although you can get wonky ones) - flat and quite broad with a rounded tip which fits my cuticles nicely. I added the white pattern with a nail art brush and finished off with the teal detailing, using A England 'Galahad'. If you've been reading my blog from the start, you'll know I love A England and Galahad is another delight - sometimes he looks dusty and sometimes bright, but always beautiful.


It would have been nice to be able to fit a little more of the original pattern onto my nails, but I had to enlarge individual elements of it in order to give Galahad a fair showing. I am very pleased with this design, but I felt a little let down by my execution - I was just having one of those nights where nothing would behave as I wanted it to! Still, I think it looks quite lovely in person since the imperfections are less noticeable when I'm not inspecting them microscopically!


Owning the awkward thumb. 

So, what do you think? Do you dig the design? What about the bag itself? Apart from anything else, I think these colours make a really great pair - even if I need to get back to practising my freehand skills. My index finger with the little diamond is probably my favourite - how about you?

Hope you're all well - not long 'til the weekend...!

Thursday, 12 September 2013

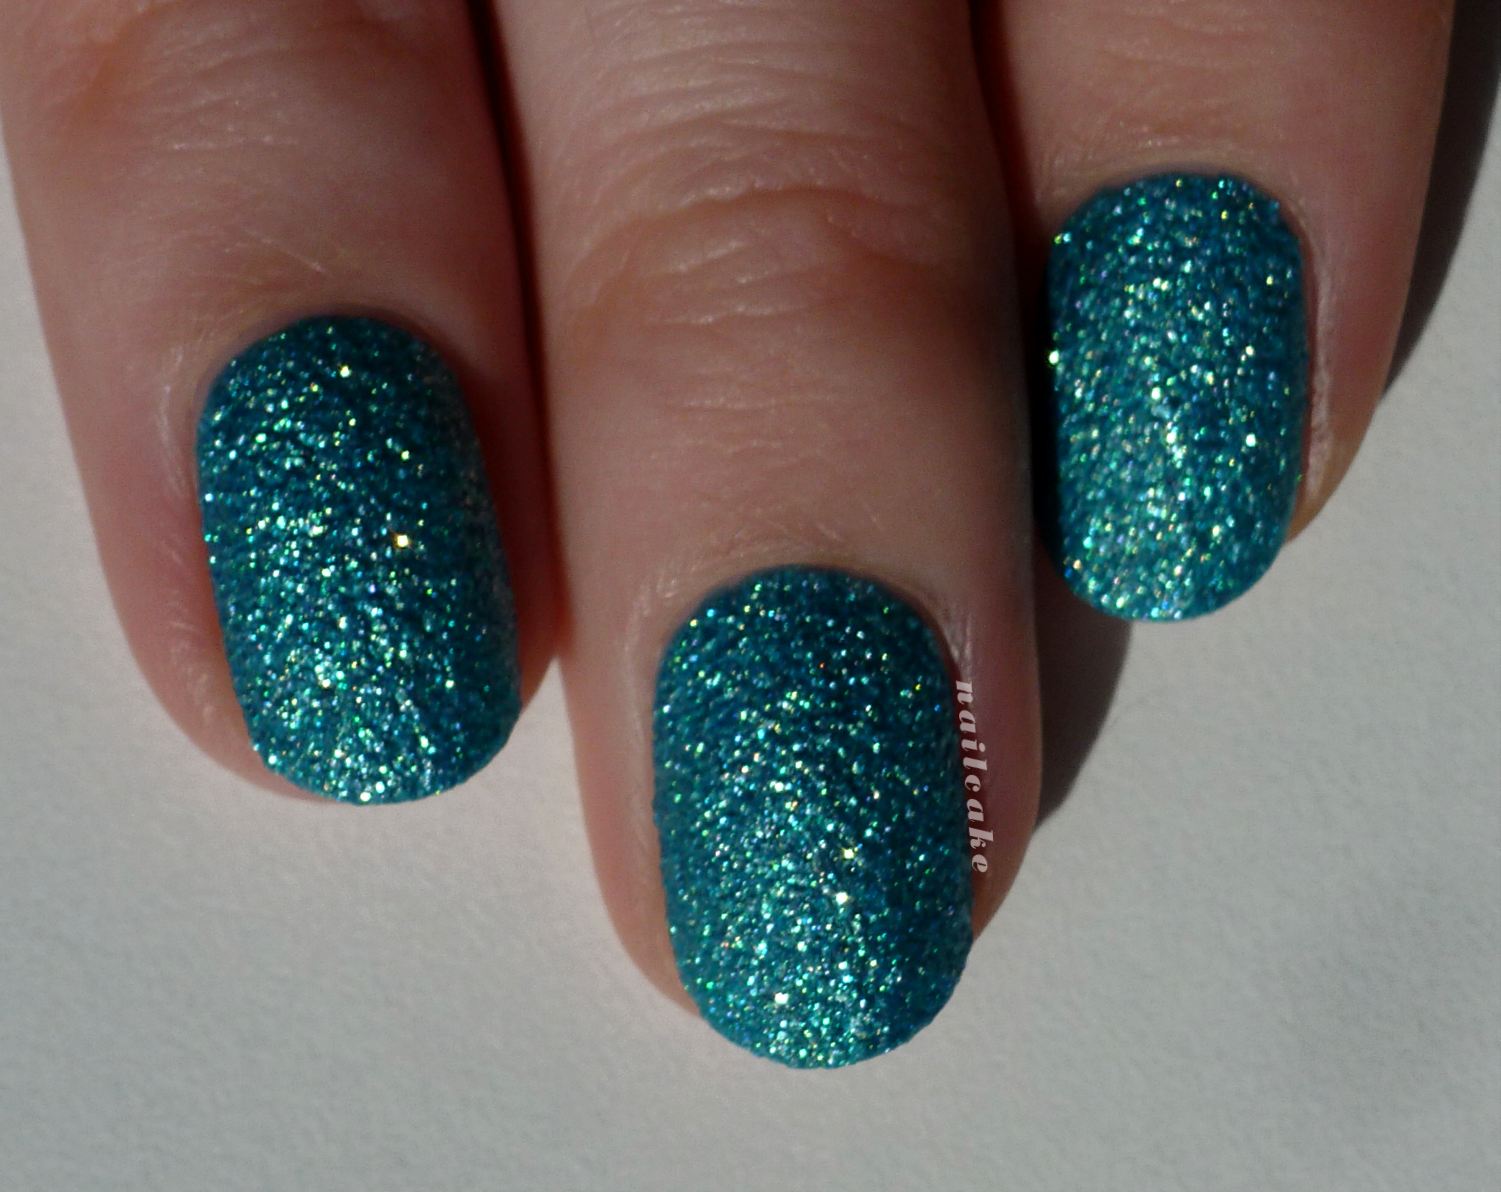
Seventeen Cameo Crush Textured Polish | Swatch & Review

Hiiii! I know, I 'don't do' swatch posts...but today I do! 


I had no idea that Boots' own brand Seventeen (or 17, whichever you prefer) was even making textured polishes. I had been planning on picking up one or two of the GOSH ones until I happened to spot these while waiting on a prescription.  Boy, am I glad I did!


Seventeen Rock Hard Couture Nail Effects in Cameo Crush (mouthful!) is a turquoise-based matte textured polish with an insane quantity of golden sparkle and also (I think) some holographic or at least iridescent sparkle, too. It was impossible to capture the true beauty of Cameo Crush on camera but please trust me when I tell you it's a mega GLITTERBOMB and utterly gorgeous. I'm not entirely au fait with the plethora of textured polishes available, but this one seems unique to me! I can sum up how this polish made me feel in two words: mermaid princess. Seriously.


Formula & Application: Dreamy! It may seem a little thick if you are used to applying very thin coats, presumably due to all the particles in it, but I found it incredibly easy to control. These pictures show two coats and next to no clean-up, even on my 'other' hand - massive bonus! In terms of opacity, you could probably get away with one thick coat, but two definitely looks better - the sparkle is intensified and you get an even distribution of texture. The brush is flat, quite small and nicely pliable - no complaints! 

I waited a good ten or fifteen minutes between my coats. I don't know if that was strictly necessary but it seemed to work well. My second coat tended to be thicker so it could glide over the already-textured nail and seemed to take a little longer to dry. If you haven't used textured polishes before (I hadn't), watching them dry is a fascinating thing. At first stroke, this seems like a fairly ordinary glittery polish, shiny and not textured at all. When it's half-way dry it develops some texture and also a metallic sort of 'sheen' - I was glad it didn't stop there! As it dries down completely, it becomes matte and the texture and sparkle come into their own. The shade also appears a little lighter when dry.


Removal: More difficult than a crème polish, but nothing like an all-out glitter. Really it just requires a little patience. I might consider using foil in the future, at least in part to try to avoid getting glitter particles all over my hands, haha. I had half expected some staining given the colour, but if there was any at all it was minimal and easily removed by a little scrubbing with a nail brush.


Blurry sparkles!


These Rock Hard Couture polishes are priced at £3.99 each and are currently buy one get one half price. The other shades are a gold called 'Charm Bracelet' (which I'm wearing right now) and an iridescent white ('Celestial Pearl' - next on my list) and a pink with gold sparkle ('Bijoux Baby').

Overall, I'm absolutely blown away by this polish. I was a texture-sceptic, but I have been converted! I'm delighted that the British high street has come up with such a high quality alternative to brands which are more difficult and expensive to get hold of in the UK; and in particular that they've produced some original shades. I really hope these polishes get the attention they deserve and that Seventeen makes more colours! I know I'm going to be hassling them to...


So, how was my first swatch post? Did I cover everything you might want to know? Do you love this polish like I do? Please also let me know if you'd be happy to see more swatch posts - it's not something I envision doing a great deal of, but occasionally I come across something I love enough to want to share! 

Sunday, 25 August 2013

Despicable Me 2 | Minions Nail Art

Hi friends! I had no plans for Minion nails but we're fiiinally going to see Despicable Me 2 tomorrow and I was wearing yellow already, so it was clearly FATE. I'm not really going to say anything about these since so many other people have done them already, but feel free to ask away if there's anything you'd like to know. YAY MINIONS!


The yellow is Illamasqua 'Blow' (hahaha) & the blue is Kiko 385 (which is amaaazing). (Silver is Color Club 'On the Rocks' and the brown is Nails Inc 'Fenchurch Street'.)

Do you love Minions? (If not, who ARE you?!) Hope you're enjoying a lovely weekend!

Monday, 19 August 2013

Born Pretty Store Review | Silver Spike Studs Nail Art

Products marked with an asterisk (*) were provided to me for impartial review.

Hiyaaa! Hope you all had a lovely weekend! I'm delighted to be sharing my first ever Born Pretty Store review today. If you're unfamiliar with BornPretty, then you have been much deprived: BPS is an online retailer selling (amongst other things) what seems like an infinite array of nail art supplies - and they are adding new products all the time. Their prices are very competitive & shipping is free worldwide. I'll have a discount code to share with you towards the bottom of this post.


I chose to review these 3x3.5mm conical spikes* in silver and I also made rather liberal use of these rhinestones (these are the smallest ones, 1.5mm) which I had already, (e.g. here). 3D nail art  is still relatively new to me, so spikes were quite a bold choice, but I had so much fun playing with them!  

My base colour is Nails Inc 'Belgrave Place', which I hadn't used in ages but I'm so glad I did because it is awesome. It's a rich, deep blue with a very strong purple undertone - mostly I'm sure it's a blue, but in certain lights it seems undeniably purple. It is a beauuut!


I somewhat stepped outside my comfort zone with these nails but I looove how they turned out! I messed about with various rhinestone colour combinations before I settled on this one. Generally I outlaw red+pink/orange but since I was putting spikes (spikes!) on my nails I thought I might as well go wild and just embrace all the colour clashing.  #REBELLIOUS

I had originally planned to do every nail the same as my middle finger (I tested it out on this one first) and thumb, but I thought it might be a bit of a squeeze on my pinkie - I'm so glad I ended up with this mix of designs instead!


The Product: The spikes themselves I thought were fantastic. They definitely make a statement but they're smaller than a lot of similar products I've seen, so you can go bold without going (too) big - a good thing if you're new to 3D stuff, I'd say. It also means that the flat bases of the spikes sit flush against your nails, which is pretty much crucial for me as visible/palpable edges would drive me crackers. The points are quite sharp (surprised?), so you need to take a certain amount of care when washing your hands/getting dressed/doing stuff. They're not lethal, though.

Application: I used a toothpick to plop a dab of nail glue on my nail where I wanted to attach each spike. Picking them up was probably the trickiest part! I used an ordinary pair of tweezers, aligning the flat end of the tweezers with the base of the spike, to lift each on and drop it on my nail - you have some time to adjust the position of the spike before the glue dries, so you don't need to get it perfect straight away. When lifting with the tweezers, it's really important to use only minimal pressure - if you squeeze too tight, the stud will most likely go flying! [I used broadly the same technique for the rhinestones, but picked them up with a moistened orange stick instead.]


Longevity: This was the only real issue I had with these spikes: I had to reattach/replace three out of five of them over the course of two-ish days. However: 1) They might last longer with better nail glue - I'm not convinced of the quality of mine; 2) There are probably alternative, more effective adhesive methods (I think you can use gel or acrylic, if you have those); 3) How long do you want spiky fingers for, anyway?! If you make a good job of applying them (with a decent dollop of glue or whatever you choose), I'm sure these would happily last a night out. [If I'm only using rhinestones/flatter studs, I usually attach with top coat then seal with a full layer of top coat and I find that keeps them on really well. I didn't do that here and I seemed to lose rhinestones more quickly.]


Please feel free to use my discount code - HZL91 - for 10% off whenever you purchase anything from BornPretty. I've also placed the code & link in my sidebar so you can find it any time! Be warned, though, that browsing their website can be addictive!


What do you think? Do you buy into 3D nail art? I used to think it was something I could appreciate on others but never on myself, but I think I've proved myself wrong - it's not an everyday look, but I'm dying to road test these on a night out!

Tuesday, 6 August 2013

Tropical Flowers feat. Color Club Fiesta Collection

Hello lovelies!  Just a quick post from me since I had intended to be in bed hours ago (though such is the case more or less every night, haha).  I was actually in two minds about whether or not to post these at all - although I really like them in person, I'm not entirely happy with how the photos turned out.  You're getting them anyway!


I was rather so excited to come across the Color Club Fiesta Collection in TK Maxx last week - other people always seem to find bargains there but this was my first, which made it kind of irresistible...though the colours are nice too, haha.  This design made use of Endless Summer - blue, Sunrise Canyon - chartreuse (or at least, that's what I would call it) and Wild Cactus - green.  These pictures aren't perfectly colour-accurate, to my eye: I'd say Endless Summer is a touch darker and bolder (I found it to dry noticeably darker than the bottle colour, which was disappointing, though it's still nice) and Wild Cactus a bit deeper/greener and less teal-y.  

The idea for the leafy nails popped into my head whilst watching this MrCandiipants tutorial - although I'm not sure if it will be obvious why...  Of course, I couldn't do without an accent nail or two and flowers seemed the natural accompaniment.  Originally, I had used the pink polish in the same collection (Flamingo) for the flowers on a base of Endless Summer, but I took those off and much prefer them this way!


I enjoy the fun, summery vibe I get from these, despite the fact that our weather remains rather...Scottish.  What do you think?  Do you feel my viiibe?!  Haha.  This post was definitely longer than I intended...  Good night!

P.S. Yep, changed my nail shape again.  I am fickle.

Monday, 29 July 2013

piCture pOlish Blog Fest 2013

Celebrating the Year of the Blogger!


HIYA POLISHED PALS!  Can you tell I'm excited?!  I'M EXCITED.  I was utterly over the moon when I received the email inviting me to take part in piCture pOlish Blog Fest 2013, not least because I had never had the opportunity to try their polishes before.  For those unfamiliar with Blog Fest, it is an annual event run by PP and involving bloggers from all around the world and this year, Blog Fest is celebrating amazing nail art.  Three lucky participants will also be chosen to create a PP collaboration shade each, for release in 2014.  The voting will take place on PP's special Blog Fest 2013 Pinterest board - if you'd like to see the other entries and take part in the voting, you can find that here: http://pinterest.com/picturepolish/

I was sent these three shades to play with:


Ocean - 'An octopus garden in the shade...'
Ruby Blou - 'Dazzling red, sparkling blue'
Atomic - ' WARNING...totally explosive!'

As you can see, Ocean and Atomic were created by Kelly's Kolors and Samarium's Swatches respectively - I hope I've done their beautiful creations justice!  So without further ado, here is my contribution to Blog Fest 2013!


Ta daaah!  Being so used to working with cremes, I was initially unsure how best to show off these three shades, but I am pleased with how they turned out.   If you'd like to recreate the look, you're in luck, because here is my FIRST EVER TUTORIAL!


1: After applying base coat, paint your base colour - this is three thin coats of Atomic.
2: Using a nail art brush - or the bottle brush, if you're so inclined - paint the shapes of your flowers.*
3: Outline your flowers in black, using a nail art brush or pen, then frame the rest of your nail (which I forgot to take a picture of, oops).  Don't frame the parts where the flowers are!
4: Glitter placement - plop some Ruby Blou on a bit of paper/tin foil and use a toothpick/dotting tool/weapon of choice to pick up individual pieces of glitter and arrange them roughly to form the centres of your flowers.
5: Add top coat & clean up if necessary, and you're done!
*When I used Ruby Blou as a base, I painted the flowers in black and added Atomic over the top afterwards.

The polishes themselves are really beautiful.  Ocean is super sparkly with holo-ish flakes in a turquoise jelly base.  It is quite sheer but the formula is lovely, so it truly isn't a hassle to layer it up.  Ruby Blou is a delightful mix of large and small hex (I think) glitters in red, blue and silver, suspended in a clear base.  Atomic isn't something I would necessarily have thought of as a 'me' colour, but it really is incredibly gorgeous and so complex.  The base is a silvery white shimmery affair, but there are loads of little flakes in there too - I see pink and green and gold reflections and sparkles.  I've included some bottle photos especially to try to capture some of the more complex elements of Ocean and Atomic.


Pretty special, right?  


What do you think?  Are you a piCture pOlish fan?  I'm certainly impressed!  You can find PP's polishes on their website or at one of their worldwide distributors.  If you're in the UK (& perhaps Europe?) you can find piCture pOlish at the wonderful Sally Magpies.  

HAPPY BLOG FEST 2013 EVERYONE!  I can't wait to check out all the other bloggers!

 pOlish On-line Store     Facebook     Twitter     Pinterest     Instagram


EDIT: Now you can check out some of the other BlogFesters' posts below and add your own, if you haven't already!