Pages

Showing posts with label Review. Show all posts

Friday, 7 March 2014

Morgan Taylor 'Little Misfit' Swatches & Review + Nail Art

* Product provided for review

Hello again! Today I'm reviewing the second polish I received from Morgan Taylor's Glam Rock collection, 'Little Misfit'*. If you missed 'Polished Up Punk', you can see it here, along with some information about the collection and the brand.

Before I start, I want to forewarn you that some of these photos are rather...unflattering. This polish was a rascal to photograph and I ended up contorting my hand into weird positions to try to capture it as best I could. 'Little Misfit' is described by Morgan Taylor as a 'Lavender and Aqua Duo-chrome' and it looks like this...


Monday, 3 March 2014

Morgan Taylor 'Polished Up Punk' Swatches & Review + Nail Art


* Product provided for review


Hello! I know I sound like a record stuck on repeat, but apologies yet again for being so absent. I've been away from home so much over the past month it feels like I've hardly been here...but things have settled down now, so here I am!

I was delighted to be contacted by Morgan Taylor recently and asked to review a couple of polishes from their 'Glam Rock' collection (which I believe was for Winter 2014). The Glam Rock collection is described as 'A mixture of funky metallic shades and glitters to bring out the rebel in you!' and consists of six polishes:


Left to right, they are:
Better in Leather – Black silver glitter
Little Misfit – Lavender and aqua duo chrome
Polished Up Punk - Navy crème
Pretty Wild – Lavender greige crème 
Rebel With A Cause – Deep burgundy pearl
Studs and Stilettos – Gunmetal glitter

If you're not familiar with the Morgan Taylor brand, here's a little blurb from the company:

'Morgan Taylor has been created by Gelish founders Danny Haile and David Daniel. The specialist formula is made from raw ingredients enhances finish, coverage and wear ensuring that not only your nails will look gorgeous but they will stay that way too!RRP £10.99 each from Sallyexpress.com'

The polish I'm showing you today is the navy crème, 'Polished Up Punk'*.  I also received 'Little Misfit', the duochrome, so expect to see that one at some point in the near future!


'Polished Up Punk', two coats plus top coat

'Polished Up Punk' is a dark navy which appears blackened in some lights, but remains just on the right side of black - by which I mean that it is almost always discernibly blue and not black. I think its depth is more apparent in the nail art photos below. It's a very winter-appropriate colour and I always think these kinds of shades look especially foxy on short nails. I found the formula very nice: it was neither too runny nor too thick, spread smoothly and had great opacity - I used two coats plus top coat here, but you could conceivably get away with one if you were careful. I also really liked the shape of the brush, which is flat but not too wide (I know a lot of people can't stand super-wide brushes) and a sensible length. Please excuse the slight scuff marks in the above photos - my goopy top coat was responsible, not the polish itself! I didn't wear this manicure long enough to comment authoritatively on wear time, but I wouldn't expect any problems if worn with a good top coat.

Aaand I wouldn't feel like I was blogging properly if I didn't throw in some nail art, so...

Saturday, 25 January 2014

Burns' Night Nail Art/BPS Striping Tape Review

Hi friends! Just a quick post from me tonight - some Scottish-y themed nail art for Burns' Night and a wee review of this striping tape from Born Pretty Store. (Discount code at the bottom of the post, too!)


Friday, 8 November 2013

Neutral Leopard, Popping Neon | BornPretty Fluorescent Studs Review & Nail Art

Hi friends! Apologies for the extended absence. I'm back with another review for BornPrettyStore.com, this time for these fluorescent studs. I'm sure I've mentioned before that I've always been impressed by BornPretty's value and service, so I won't rehash all that. You'll find a 10% discount code at the bottom of this post (and also in my sidebar).

On to the fun stuff! Here's the nail art/inspiration combo:


It's possible to draw inspiration from what is, in essence, an advert - who knew?! 

So, the studs. I like them a lot. There are are 2mm squares and circles in each of six colours. The first thing I have to point out is that they are waaay brighter than the above photo shows - my camera refuses to accept that neons (or at least pink ones) exist. My 'phone camera kind of likes them though, so you can enjoy this fuzzy delight:


I'd say that's relatively colour-accurate (if not quite perfect). The product page says there are 400-ish in the box; I'm not going to count them, but there seem to be plenty. In case you're interested, that would work out at approximately 67 per section if evenly divided. Do with that information what you will.

For me, 2mm is an ideal size for studs and so on - I generally don't like my decorations too big. The backs are hollow and I found them pretty easy to apply: plop a dot of top coat (or glue) on the nail where you want the stud to be (I use a toothpick), pick up stud with a moistened orange stick (or alternative), place it where you want it; you'll have a little time to get the placement perfect before your adhesive dries. I use a top coat over the entire nail to seal everything in and I had no problems with the colour on the studs running or anything like that. The sides of the studs do stick up a little and there's a gap before the colour starts (i.e. the sides of the studs are silver) but if you're used to wearing studs, I don't think you'll notice it at all; and if you're not, you'll soon acclimatise! 


Also a 'phone photo - sorry!

As to longevity, I think you can expect these studs to last a good few days, at least. I did lose a couple within the first day or so, but as they were both from the same finger, I'm pretty sure that was top-coat error on my part. After a few days, I seem to have scuffed some of the colour off the top of a few studs; I'm not sure what caused it, though (there's a chance I did it with a buffer) so that might be might fault, too. I think you might be able to reuse these if you're super careful when you remove them, but my (limited) experience is that it can be tricky to get all the polish off them without stripping the neon colour, too, so it probably isn't worth the hassle.


I appear to have run out of photos, so just a brief overview of the nail art itself. Base is three coats of Sally Hansen Complete Salon Manicure in Crinoline (not a 'me' colour at all, but I love it); spots are Barry M Lychee Gelly with a teensy bit of Nails Inc Fenchurch Street mixed in; black is Orly's Liquid Vinyl. For the leopard print, I used a dabbing motion with a little brush. I used a dotting tool for the cross on my middle finger and there are some 1.5mm black rhinestones on there, too, which you can barely see.

I haven't worn leopard print in what feels like forever - I think I worry it might be perceived as 'boring' - but I kind of love it! I've seen so many great leopard colour combos lately, too. Also really digging the neon pop against the neutral background. My only qualm (with my nail art, not the studs) is that I occasionally feel I've created a leopard with chicken pox...

As always, I'd love to hear what you think in the comments and if there's anything else you'd like to know, feel free to ask. And finally:

DISCOUNT CODE

Thursday, 12 September 2013

Seventeen Cameo Crush Textured Polish | Swatch & Review

Hiiii! I know, I 'don't do' swatch posts...but today I do! 


I had no idea that Boots' own brand Seventeen (or 17, whichever you prefer) was even making textured polishes. I had been planning on picking up one or two of the GOSH ones until I happened to spot these while waiting on a prescription.  Boy, am I glad I did!


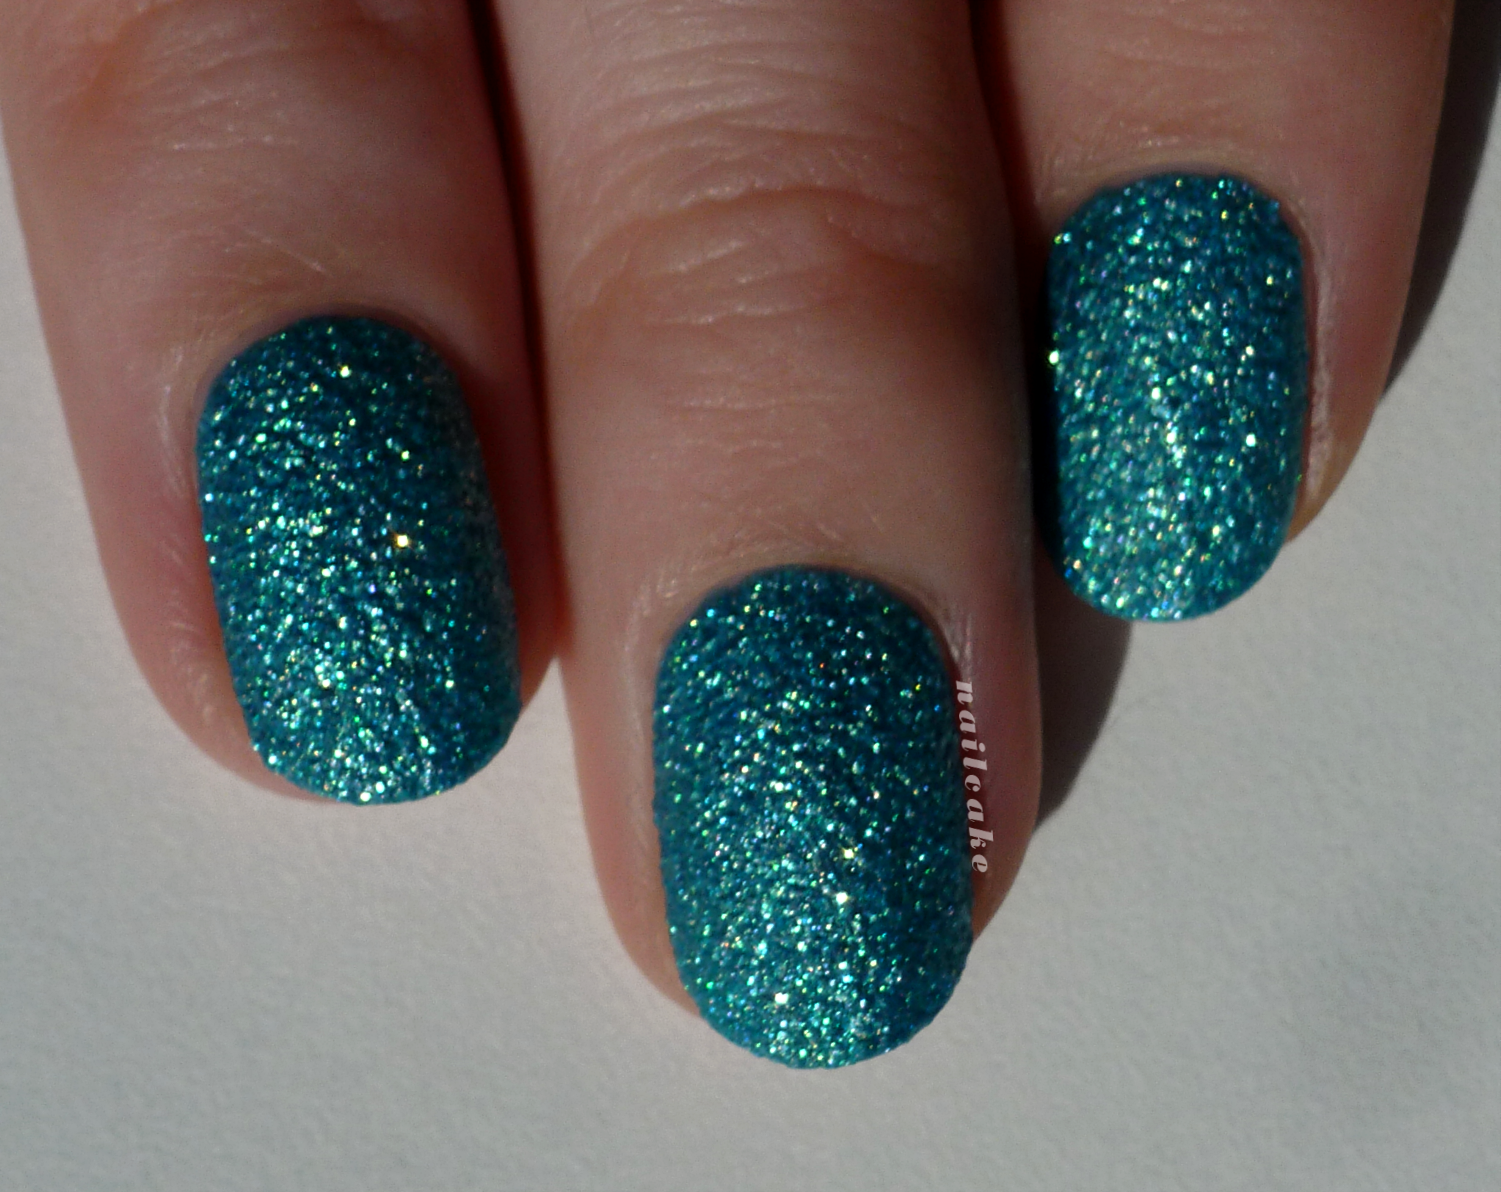
Seventeen Rock Hard Couture Nail Effects in Cameo Crush (mouthful!) is a turquoise-based matte textured polish with an insane quantity of golden sparkle and also (I think) some holographic or at least iridescent sparkle, too. It was impossible to capture the true beauty of Cameo Crush on camera but please trust me when I tell you it's a mega GLITTERBOMB and utterly gorgeous. I'm not entirely au fait with the plethora of textured polishes available, but this one seems unique to me! I can sum up how this polish made me feel in two words: mermaid princess. Seriously.


Formula & Application: Dreamy! It may seem a little thick if you are used to applying very thin coats, presumably due to all the particles in it, but I found it incredibly easy to control. These pictures show two coats and next to no clean-up, even on my 'other' hand - massive bonus! In terms of opacity, you could probably get away with one thick coat, but two definitely looks better - the sparkle is intensified and you get an even distribution of texture. The brush is flat, quite small and nicely pliable - no complaints! 

I waited a good ten or fifteen minutes between my coats. I don't know if that was strictly necessary but it seemed to work well. My second coat tended to be thicker so it could glide over the already-textured nail and seemed to take a little longer to dry. If you haven't used textured polishes before (I hadn't), watching them dry is a fascinating thing. At first stroke, this seems like a fairly ordinary glittery polish, shiny and not textured at all. When it's half-way dry it develops some texture and also a metallic sort of 'sheen' - I was glad it didn't stop there! As it dries down completely, it becomes matte and the texture and sparkle come into their own. The shade also appears a little lighter when dry.


Removal: More difficult than a crème polish, but nothing like an all-out glitter. Really it just requires a little patience. I might consider using foil in the future, at least in part to try to avoid getting glitter particles all over my hands, haha. I had half expected some staining given the colour, but if there was any at all it was minimal and easily removed by a little scrubbing with a nail brush.


Blurry sparkles!


These Rock Hard Couture polishes are priced at £3.99 each and are currently buy one get one half price. The other shades are a gold called 'Charm Bracelet' (which I'm wearing right now) and an iridescent white ('Celestial Pearl' - next on my list) and a pink with gold sparkle ('Bijoux Baby').

Overall, I'm absolutely blown away by this polish. I was a texture-sceptic, but I have been converted! I'm delighted that the British high street has come up with such a high quality alternative to brands which are more difficult and expensive to get hold of in the UK; and in particular that they've produced some original shades. I really hope these polishes get the attention they deserve and that Seventeen makes more colours! I know I'm going to be hassling them to...


So, how was my first swatch post? Did I cover everything you might want to know? Do you love this polish like I do? Please also let me know if you'd be happy to see more swatch posts - it's not something I envision doing a great deal of, but occasionally I come across something I love enough to want to share! 

Monday, 19 August 2013

Born Pretty Store Review | Silver Spike Studs Nail Art

Products marked with an asterisk (*) were provided to me for impartial review.

Hiyaaa! Hope you all had a lovely weekend! I'm delighted to be sharing my first ever Born Pretty Store review today. If you're unfamiliar with BornPretty, then you have been much deprived: BPS is an online retailer selling (amongst other things) what seems like an infinite array of nail art supplies - and they are adding new products all the time. Their prices are very competitive & shipping is free worldwide. I'll have a discount code to share with you towards the bottom of this post.


I chose to review these 3x3.5mm conical spikes* in silver and I also made rather liberal use of these rhinestones (these are the smallest ones, 1.5mm) which I had already, (e.g. here). 3D nail art  is still relatively new to me, so spikes were quite a bold choice, but I had so much fun playing with them!  

My base colour is Nails Inc 'Belgrave Place', which I hadn't used in ages but I'm so glad I did because it is awesome. It's a rich, deep blue with a very strong purple undertone - mostly I'm sure it's a blue, but in certain lights it seems undeniably purple. It is a beauuut!


I somewhat stepped outside my comfort zone with these nails but I looove how they turned out! I messed about with various rhinestone colour combinations before I settled on this one. Generally I outlaw red+pink/orange but since I was putting spikes (spikes!) on my nails I thought I might as well go wild and just embrace all the colour clashing.  #REBELLIOUS

I had originally planned to do every nail the same as my middle finger (I tested it out on this one first) and thumb, but I thought it might be a bit of a squeeze on my pinkie - I'm so glad I ended up with this mix of designs instead!


The Product: The spikes themselves I thought were fantastic. They definitely make a statement but they're smaller than a lot of similar products I've seen, so you can go bold without going (too) big - a good thing if you're new to 3D stuff, I'd say. It also means that the flat bases of the spikes sit flush against your nails, which is pretty much crucial for me as visible/palpable edges would drive me crackers. The points are quite sharp (surprised?), so you need to take a certain amount of care when washing your hands/getting dressed/doing stuff. They're not lethal, though.

Application: I used a toothpick to plop a dab of nail glue on my nail where I wanted to attach each spike. Picking them up was probably the trickiest part! I used an ordinary pair of tweezers, aligning the flat end of the tweezers with the base of the spike, to lift each on and drop it on my nail - you have some time to adjust the position of the spike before the glue dries, so you don't need to get it perfect straight away. When lifting with the tweezers, it's really important to use only minimal pressure - if you squeeze too tight, the stud will most likely go flying! [I used broadly the same technique for the rhinestones, but picked them up with a moistened orange stick instead.]


Longevity: This was the only real issue I had with these spikes: I had to reattach/replace three out of five of them over the course of two-ish days. However: 1) They might last longer with better nail glue - I'm not convinced of the quality of mine; 2) There are probably alternative, more effective adhesive methods (I think you can use gel or acrylic, if you have those); 3) How long do you want spiky fingers for, anyway?! If you make a good job of applying them (with a decent dollop of glue or whatever you choose), I'm sure these would happily last a night out. [If I'm only using rhinestones/flatter studs, I usually attach with top coat then seal with a full layer of top coat and I find that keeps them on really well. I didn't do that here and I seemed to lose rhinestones more quickly.]


Please feel free to use my discount code - HZL91 - for 10% off whenever you purchase anything from BornPretty. I've also placed the code & link in my sidebar so you can find it any time! Be warned, though, that browsing their website can be addictive!


What do you think? Do you buy into 3D nail art? I used to think it was something I could appreciate on others but never on myself, but I think I've proved myself wrong - it's not an everyday look, but I'm dying to road test these on a night out!